Friday, September 13, 2024
No menu items!
HomeFood10 HEALTHY DESSERTS THAT WONT DERAIL YOUR DIET

10 HEALTHY DESSERTS THAT WONT DERAIL YOUR DIET

Last Updated on December 12, 2023 by Silvy

10 HEALTHY DESSERTS THAT WONT DERAIL YOUR DIET


In the perennial quest for balance between health and indulgence, the desire for a sweet treat often clashes with the commitment to a wholesome diet.

It’s a familiar dilemma: how to satiate that persistent sweet tooth without derailing the hard-earned progress made in adhering to dietary goals.

But fear not, for we have embarked on a flavorful expedition to curate a tantalizing collection of 10 healthy desserts that promise to be the solution to this age-old conundrum.

Picture this: a culinary journey where the mere thought of dessert doesn’t send your diet plan into a tailspin. Imagine a realm where delighting in sweetness is not only permissible but actively encouraged by the inclusion of nutrient-rich ingredients.

This is precisely the realm we invite you to explore—a realm where the term “healthy dessert” is not an oxymoron but a promise of delectable satisfaction.

Our list isn’t just a compilation; it’s a carefully crafted selection that understands the nuances of balancing flavor, texture, and nutritional value.

These are not just desserts; they are the embodiment of a harmonious coexistence between your sweet cravings and your commitment to health.

As we embark on this delectable journey, the emphasis is not on deprivation but on discovery. We present guilt-free options that not only satiate your palate but also contribute positively to your well-being.

From the succulent sweetness of ripe fruits to the creamy richness of avocados, each dessert is a testament to the idea that health-conscious choices can be a source of joy rather than restriction.

So, let’s take a plunge into this world of delightful treats, where the satisfaction of your sweet tooth is not a compromise but a celebration of your dedication to a balanced and healthy lifestyle.

Prepare to indulge without guilt, savor without reservation, and revel in the knowledge that your health goals need not stand in the way of your sweet cravings.

Welcome to the world of desserts reimagined—a world where sweetness and nutrition walk hand in hand, ensuring that your journey towards a healthier you is as delightful as it is delicious.

Craving something sweet without compromising your diet?

Look no further! We’ve compiled a mouthwatering list of 10 healthy desserts that will satisfy your sweet tooth without sending your diet off course.

In this delectable journey, we’ll explore guilt-free options that are as delicious as they are nutritious.

Let’s dive into the world of delightful treats that won’t sabotage your health goals!


Fruitful Bliss: Berry Parfait
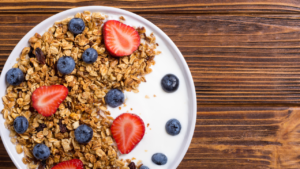
 

Fruitful Bliss: Berry Parfait

Embark on a journey of vibrant flavors and wholesome goodness with our delectable Berry Parfait—a delightful fusion of nature’s sweetness, creamy Greek yogurt, and the satisfying crunch of granola.

Kick things off on a healthy note as this parfait not only tantalizes your taste buds but also serves as a nutritious treat packed with antioxidants and essential vitamins.


Ingredients:

  • 1 cup mixed berries (strawberries, blueberries, raspberries)
  • 1 cup Greek yogurt (plain or flavored)
  • 1/2 cup granola
  • 1 tablespoon honey or maple syrup (optional, for added sweetness)
  • Fresh mint leaves for garnish (optional)


Instructions:

Prepare the Berries: Wash and gently dry the mixed berries. If using strawberries, hull and slice them for a variety of textures.

Layer with Greek Yogurt: In serving glasses or bowls, start by layering a spoonful of Greek yogurt at the bottom. The creamy yogurt creates a luscious base for the layers to come.

Add a Burst of Berries: Introduce a generous handful of mixed berries over the Greek yogurt layer.

The combination of sweet strawberries, juicy blueberries, and tart raspberries creates a burst of natural sweetness and a spectrum of flavors.

Sprinkle with Granola: Continue building the parfait by sprinkling a layer of granola over the berries. The granola introduces a delightful crunch, adding texture to the parfait.

Repeat the Layers: Repeat the layering process until the serving glasses are filled, finishing with a dollop of Greek yogurt on top. Drizzle honey or maple syrup for an optional touch of sweetness.

Garnish and Serve: Garnish your Berry Parfait with fresh mint leaves for a visually appealing and aromatic finish. Serve immediately and relish the harmonious blend of textures and flavors.


This Berry Parfait is not just a dessert; it’s a celebration of nature’s bounty, where the sweetness of fresh berries meets the creamy richness of Greek yogurt and the satisfying crunch of granola.

Packed with antioxidants and essential vitamins, each spoonful not only delights your taste buds but also nourishes your body, making it the perfect guilt-free indulgence to kick off any meal or satisfy your sweet cravings.

Chocolate Indulgence: Avocado Brownies


Chocolate Indulgence: Avocado Brownies

Unleash your taste buds into a world of unconventional decadence with our Avocado Brownies—where the richness of chocolate meets the creamy goodness of avocado.

Yes, you read it right, avocado in brownies!

Brace yourself for an extraordinary culinary journey that not only satisfies your chocolate cravings but also introduces a guilt-free twist, thanks to the addition of nutrient-rich avocados.


Ingredients:

  • 1 ripe avocado, mashed
  • 1 cup dark chocolate chips or chunks
  • 1/4 cup coconut oil
  • 1 cup coconut sugar or sweetener of choice
  • 2 large eggs
  • 1 teaspoon vanilla extract
  • 1/2 cup cocoa powder
  • 1/2 cup almond flour
  • 1/2 teaspoon baking powder
  • A pinch of salt
  • Optional: Chopped nuts or additional chocolate chips for texture


Instructions:

Preheat the Oven: Begin by preheating your oven to 350°F (175°C). Grease a baking pan and set it aside.

Melt Chocolate and Coconut Oil: In a heatproof bowl, melt the dark chocolate chips or chunks along with the coconut oil.

This can be done using a double boiler or by microwaving in short intervals, stirring until smooth.

Prepare the Avocado Base: Mash the ripe avocado in a separate bowl until creamy and free of lumps.

Add the melted chocolate-coconut oil mixture to the mashed avocado, combining them into a velvety base.

Incorporate Wet Ingredients: To the avocado-chocolate mixture, add the coconut sugar or sweetener of choice, eggs, and vanilla extract.

Mix until the wet ingredients are well incorporated.

Sift Dry Ingredients: In a separate bowl, sift together the cocoa powder, almond flour, baking powder, and a pinch of salt.

Gradually fold these dry ingredients into the wet mixture until a thick brownie batter is formed.

Add Optional Texture: For an extra layer of texture, fold in chopped nuts or additional chocolate chips into the batter. This step introduces delightful surprises in every bite.

Bake to Perfection: Transfer the brownie batter into the prepared baking pan, spreading it evenly.

Bake in the preheated oven for approximately 25-30 minutes or until a toothpick inserted into the center comes out with moist crumbs.

Cool and Indulge: Allow the Avocado Brownies to cool in the pan before slicing them into delectable squares.

Revel in the fudgy, chocolatey goodness that these brownies offer, all while benefiting from the creamy texture and healthy fats provided by the unexpected hero—avocado.


Dive into the world of indulgence without derailing your diet with these Avocado Brownies. The avocado not only lends a luscious creaminess to the brownies but also contributes healthy fats, turning this treat into a guilt-free delight.

Savor each bite of these unconventional brownies, where decadence meets nutrition in a fusion that challenges the ordinary and elevates your dessert experience.


Cool Treat: Watermelon Sorbet


Cool Treat: Watermelon Sorbet

Quench your thirst for a refreshing treat with our delightful Watermelon Sorbet—a two-ingredient wonder that not only promises to satiate your cravings but does so with a guilt-free twist.

This easy-to-make sorbet is a celebration of simplicity and natural sweetness, offering a frozen delight that’s not just refreshing but also low in calories—a perfect answer to those moments when you long for something cool and satisfying.


Ingredients:

  • 4 cups cubed seedless watermelon
  • 2 tablespoons honey or agave syrup (optional, depending on sweetness preference)


Instructions:

Prepare the Watermelon: Start by ensuring your watermelon is seedless and cut it into bite-sized cubes. Removing the seeds ensures a smooth and enjoyable sorbet texture.

Freeze the Watermelon: Spread the watermelon cubes in a single layer on a parchment-lined tray and freeze them until solid. This step is crucial for achieving the sorbet’s delightful texture.

Blend into Sorbet: Once the watermelon cubes are frozen, transfer them to a high-powered blender or food processor.

Blend until smooth and creamy, creating a sorbet base that captures the essence of ripe, frozen watermelon.

Sweeten to Taste: Taste the pureed watermelon and, if desired, add honey or agave syrup to sweeten according to your preference.

Blend again briefly to ensure even sweetness throughout the sorbet.

Refreeze for Perfect Consistency: Transfer the blended watermelon mixture into a shallow, freezer-safe container.

Spread it evenly and freeze for an additional 2-3 hours. This ensures the sorbet achieves the ideal consistency for scooping.

Scoop and Serve: Once fully frozen, use a scoop or spoon to create tantalizing servings of Watermelon Sorbet. Garnish with fresh mint leaves or a wedge of watermelon for an extra touch of elegance.


Bask in the sheer simplicity of this Watermelon Sorbet, a treat that embraces the natural sweetness of watermelon without the need for additional sugars or preservatives.

With just two ingredients, this frozen delight embodies the essence of summer, offering a cool and satisfying escape that won’t weigh you down with unnecessary calories.

Relish each spoonful, savoring the pure, frozen goodness of watermelon in a sorbet that epitomizes the joy of simplicity.


Protein-Packed Joy: Greek Yogurt Popsicles


Protein-Packed Joy: Greek Yogurt Popsicles

Satisfy your ice-cold cravings without sacrificing your protein intake with our delectable Greek Yogurt Popsicles—a refreshing answer to the summer heat that not only delights your taste buds but also provides a protein-packed treat for your body.

Crafted with a variety of flavors, these popsicles offer a guilt-free and delicious option, making them an ideal indulgence post-workout or whenever you desire a cool, satisfying snack.


Ingredients:

  • 2 cups Greek yogurt (plain or flavored)
  • 1 cup fresh fruits (such as berries, mango, or kiwi)
  • 2 tablespoons honey or maple syrup (adjust to taste)
  • 1 teaspoon vanilla extract
  • Optional: Granola, chopped nuts, or dark chocolate chips for added texture


Instructions:

Prepare the Yogurt Base: In a mixing bowl, combine the Greek yogurt, honey or maple syrup, and vanilla extract.

Mix thoroughly to create a smooth and sweetened yogurt base that serves as the foundation for your popsicles.

Blend in Fresh Fruits: Incorporate your choice of fresh fruits into the yogurt base. Whether it’s the tartness of berries, the tropical sweetness of mango, or the vibrant green goodness of kiwi, the options are endless.

Blend the mixture until the fruits are evenly distributed.

Add Optional Ingredients: Elevate the texture and flavor of your popsicles by adding optional ingredients such as granola, chopped nuts, or dark chocolate chips.

These additions not only enhance the taste but also provide a delightful crunch in every bite.

Fill Popsicle Molds: Pour the yogurt mixture into popsicle molds, ensuring an even distribution of fruits and optional ingredients.

Insert popsicle sticks into the center of each mold, allowing them to stand upright.

Freeze to Perfection: Place the filled molds in the freezer and allow them to freeze for at least 4 hours or until completely solid.

This patience is rewarded with popsicles that boast a creamy texture and a burst of fruity goodness.

Unmold and Enjoy: Once frozen, gently unmold the Greek Yogurt Popsicles by running warm water over the molds.

Now, you’re ready to indulge in a protein-rich, flavor-packed treat that satisfies both your sweet tooth and your post-workout protein needs.


These Greek Yogurt Popsicles not only offer a cooling respite on a hot day but also serve as a smart and delicious way to replenish your body with protein after a workout.

Embrace the variety of flavors and textures, reveling in a frozen delight that strikes the perfect balance between health-conscious choices and sweet indulgence.


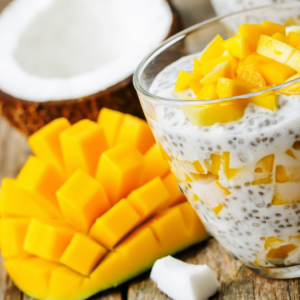
Tropical Delight: Coconut Mango Chia Pudding


Tropical Delight: Coconut Mango Chia Pudding

Embark on a culinary escapade as we transport your taste buds to the sun-kissed tropics with our luscious Coconut Mango Chia Pudding.

This enchanting dessert is a symphony of textures and flavors, marrying the nutritional prowess of chia seeds with the irresistible tropical duo of coconut and mango.

Brace yourself for a healthy twist on the classic pudding that promises not only to tantalize your palate but also to align seamlessly with your dietary goals.


Ingredients:

  • 1/4 cup chia seeds
  • 1 cup coconut milk (full-fat for creaminess)
  • 1 ripe mango, peeled and diced
  • 2 tablespoons shredded coconut (unsweetened)
  • 1 tablespoon honey or maple syrup (adjust to taste)
  • 1/2 teaspoon vanilla extract
  • A pinch of salt


Instructions:

Prepare the Chia Base: In a mixing bowl, combine the chia seeds, coconut milk, honey or maple syrup, vanilla extract, and a pinch of salt.

Stir the mixture thoroughly, ensuring that the chia seeds are evenly distributed. Let it sit for about 10 minutes to allow the seeds to absorb the liquid.

Refrigerate the Chia Mixture: Once well-mixed, cover the bowl and refrigerate the chia mixture for at least 2 hours or overnight.

This step allows the chia seeds to gel, creating a pudding-like consistency.

Layer with Mango Goodness: When the chia pudding has reached the desired thickness, take serving glasses or bowls and layer the pudding with diced mango.

The vibrant sweetness of mango adds a burst of tropical delight to every spoonful.

Top with Shredded Coconut: Sprinkle a generous amount of shredded coconut on top of each serving.

The coconut not only enhances the flavor profile but also introduces a delightful crunch to the velvety pudding.

Serve and Savor: Present your Coconut Mango Chia Pudding as a visually appealing treat. Dive into the layers of creamy chia goodness, succulent mango, and the exotic essence of coconut, relishing each spoonful of this tropical escape.


This Coconut Mango Chia Pudding isn’t just a dessert; it’s a healthful journey to the tropics, offering a palate-pleasing experience without compromising your dietary goals.

Revel in the richness of coconut, the sweetness of mango, and the wholesome goodness of chia seeds, crafting a dessert that’s as nourishing as it is delicious.


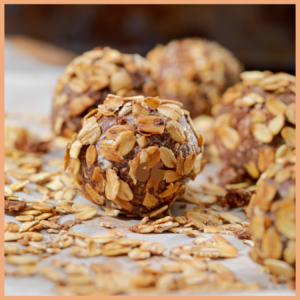
Nutty Elegance: Almond Butter Energy Bites


Nutty Elegance: Almond Butter Energy Bites

Elevate your snack game with our Almond Butter Energy Bites—a quick and nutritious solution for those moments when you need an energy boost without the impending sugar crash.

These bite-sized delights are meticulously crafted to be the perfect amalgamation of protein, healthy fats, and a hint of sweetness, providing a satisfying snack that not only tantalizes your taste buds but also aligns seamlessly with your health goals.


Ingredients:

  • 1 cup old-fashioned oats
  • 1/2 cup almond butter (or your favorite nut butter)
  • 1/3 cup honey or maple syrup
  • 1 cup shredded coconut (unsweetened)
  • 1/2 cup ground flaxseed
  • 1 teaspoon vanilla extract
  • A pinch of salt
  • Optional: Dark chocolate chips, chopped nuts, or dried fruits for added texture and flavor


Instructions:

Combine Dry Ingredients: In a large mixing bowl, combine the old-fashioned oats, shredded coconut, and ground flaxseed.

These ingredients form the base of your energy bites, offering a satisfying texture and a wealth of nutritional benefits.

Add Wet Ingredients: Introduce the almond butter, honey or maple syrup, vanilla extract, and a pinch of salt to the dry mixture.

Stir the ingredients thoroughly until a cohesive and slightly sticky dough forms.

Incorporate Optional Add-Ins: Elevate your energy bites by adding optional ingredients such as dark chocolate chips, chopped nuts, or dried fruits.

These additions not only enhance the flavor profile but also contribute extra nutrients and textures.

Shape into Bites: With the dough ready, take small portions and roll them into bite-sized balls. The slightly sticky texture ensures that the bites hold their shape while remaining irresistibly chewy.

Chill and Set: Place the formed energy bites on a parchment-lined tray and refrigerate for at least 30 minutes. This step allows the bites to firm up, making them easier to handle and adding a refreshing coolness to each bite.

Store and Enjoy: Once chilled, transfer the Almond Butter Energy Bites to an airtight container. These bites can be stored in the refrigerator for up to two weeks, offering a convenient and healthful snack whenever you need a quick energy pick-me-up.


Say goodbye to the midday slump and hello to sustained energy with these protein-packed, nutrient-rich Almond Butter Energy Bites.

Not only do they provide a delightful burst of flavor, but they also serve as a portable and guilt-free snack that supports your health goals by delivering the perfect combination of wholesome ingredients.


Baked Goodness: Oatmeal Banana Bread


Baked Goodness: Oatmeal Banana Bread

Embark on a delightful journey of flavor and health with our Oatmeal Banana Bread—a wholesome twist on the classic favorite.

This delectable creation seamlessly combines the rich, comforting taste of traditional banana bread with the nutritional goodness of oats, making it the perfect guilt-free indulgence for breakfast or dessert.


Ingredients:

  • 2 to 3 ripe bananas, mashed
  • 1/3 cup melted coconut oil or olive oil
  • 1/2 cup honey or maple syrup (adjust to taste)
  • 1 teaspoon vanilla extract
  • 2 large eggs
  • 1 3/4 cups old-fashioned oats
  • 1 teaspoon baking soda
  • 1/2 teaspoon salt
  • 1 teaspoon ground cinnamon
  • Optional: 1/2 cup chopped nuts or chocolate chips


Instructions:

Preheat the Oven: Begin by preheating your oven to 325°F (163°C). Grease a standard-sized loaf pan and set it aside.

Prepare Wet Ingredients: In a large mixing bowl, combine the mashed bananas, melted coconut oil or olive oil, honey or maple syrup, vanilla extract, and eggs.

Mix the ingredients thoroughly until well combined.

Incorporate Dry Ingredients: In a separate bowl, whisk together the oats, baking soda, salt, and ground cinnamon. Gradually add these dry ingredients to the wet mixture, stirring until a uniform batter is formed.

Add Optional Ingredients: Enhance your banana bread by incorporating chopped nuts or chocolate chips into the batter, providing an extra layer of texture and flavor.

Bake to Perfection: Pour the batter into the greased loaf pan, spreading it evenly. Bake in the preheated oven for approximately 60 to 70 minutes or until a toothpick inserted into the center comes out clean.

Cool and Serve: Once baked to golden perfection, allow the Oatmeal Banana Bread to cool in the pan for 10 minutes before transferring it to a wire rack. Let it cool further before slicing into delightful servings.


Enjoy a slice of this wholesome delight with your morning coffee or savor it as a guilt-free dessert option.

The addition of oats not only imparts a hearty texture but also introduces a wealth of nutritional benefits.

Revel in the fusion of sweet, banana-infused goodness with the heartiness of oats in every moist and delicious bite of our Oatmeal Banana Bread.


Citrus Zing: Lemon Blueberry Frozen Yogurt


Citrus Zing: Lemon Blueberry Frozen Yogurt

Quench your summer cravings with a burst of freshness from our Lemon Blueberry Frozen Yogurt—a delightful creation that harmoniously marries the zesty allure of lemons with the sweet abundance of blueberries.

This frozen treat not only tantalizes your taste buds but also stands as a healthier alternative to traditional ice cream, making it the perfect guilt-free indulgence for those scorching hot summer days.


Ingredients:

  • 2 cups fresh or frozen blueberries
  • 1 cup plain Greek yogurt
  • 1/2 cup honey or maple syrup (adjust to taste)
  • Zest of one lemon
  • 2 tablespoons freshly squeezed lemon juice


Instructions:

Prepare the Blueberries: If using fresh blueberries, wash and set them aside. If opting for frozen, allow them to thaw slightly.

Blend Blueberry Base: In a blender, combine the blueberries, Greek yogurt, honey or maple syrup, lemon zest, and freshly squeezed lemon juice.

Blend until the mixture reaches a smooth consistency, creating a vibrant and flavorful blueberry base.

Chill the Mixture: Transfer the blended mixture into a bowl and refrigerate for approximately 2 hours. This step enhances the flavors and ensures that your frozen yogurt achieves the perfect texture.

Churn and Freeze: If you have an ice cream maker, follow the manufacturer’s instructions to churn the blueberry yogurt mixture.

If not, simply transfer it to a freezer-safe container, ensuring to stir the mixture every 30 minutes during the initial freezing process to prevent ice crystals from forming.

Serve and Enjoy: Once your Lemon Blueberry Frozen Yogurt reaches the desired consistency, scoop it into bowls or cones.

Garnish with additional blueberries or a twist of lemon zest for a visually appealing and extra flavorful touch.


Indulge in the cool, tangy goodness of this frozen delight, where the zing of lemon perfectly complements the burst of blueberry sweetness.

This guilt-free treat not only provides relief on hot summer days but also nourishes your body with the goodness of Greek yogurt and the antioxidant-rich blueberries.

Savor the taste of summer while staying true to your health goals with our Lemon Blueberry Frozen Yogurt.


Spiced Perfection: Cinnamon Baked Apples
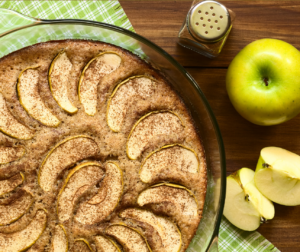
 

Spiced Perfection: Cinnamon Baked Apples

Indulge in the warm embrace of our guilt-free Cinnamon Baked Apples, a dessert that not only satiates your sweet tooth but also envelops you in comforting flavors.

This simple yet satisfying creation is a culinary delight that effortlessly combines the natural sweetness of apples with the aromatic warmth of cinnamon, delivering an experience akin to enjoying apple pie without a hint of guilt.


Ingredients:

  • 4 medium-sized apples (such as Honeycrisp or Granny Smith)
  • 1/4 cup chopped nuts (walnuts or pecans work well)
  • 2 tablespoons honey or maple syrup
  • 1 teaspoon ground cinnamon
  • 1/4 teaspoon ground nutmeg
  • A pinch of salt
  • Optional: 2 tablespoons melted coconut oil or butter


Instructions:

Preheat the Oven: Begin by preheating your oven to 375°F (190°C).

Prepare the Apples: Wash and core the apples, removing the seeds and creating a well in the center for the filling. You can use an apple corer or a small knife for this step.

Create the Filling: In a small bowl, mix the chopped nuts, honey or maple syrup, ground cinnamon, ground nutmeg, and a pinch of salt.

This aromatic blend will infuse the apples with a symphony of flavors.

Fill the Apples: Spoon the filling mixture into the center of each cored apple, ensuring an even distribution. If desired, drizzle melted coconut oil or butter over the top for an extra layer of richness.

Bake to Perfection: Place the filled apples in a baking dish, and bake in the preheated oven for approximately 25-30 minutes or until the apples are tender.

The kitchen will soon be filled with the delightful fragrance of baked apples and cinnamon.

Serve and Enjoy: Once baked to perfection, remove the apples from the oven and let them cool slightly. Serve them as is or with a dollop of Greek yogurt or a scoop of vanilla ice cream for an extra treat.


These Cinnamon Baked Apples are not just a dessert; they’re a comforting journey into the heart of autumn flavors.

The natural sweetness of the baked apples combines harmoniously with the aromatic cinnamon, creating a guilt-free indulgence that captures the essence of apple pie.

With every warm and satisfying bite, savor the joy of dessert without compromising your health goals.


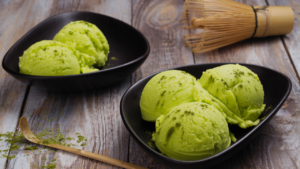
Creamy Dream: Pistachio Avocado Ice Cream


Creamy Dream: Pistachio Avocado Ice Cream

In the grand finale of our healthy dessert repertoire, we present a culinary masterpiece – the Pistachio Avocado Ice Cream.

This indulgent creation not only concludes our list but stands as a testament to the innovation that can be achieved in crafting desserts that align with health-conscious lifestyles.

Begin the journey of creating this creamy delight by gathering the following ingredients:


Ingredients:

  • 2 ripe avocados, peeled and pitted
  • 1 cup shelled pistachios
  • 1 can (14 ounces) coconut milk
  • 1/2 cup honey or maple syrup (adjust to taste)
  • 1 teaspoon vanilla extract
  • A pinch of salt


Instructions:

Prepare the Pistachios: Begin by lightly toasting the shelled pistachios in a dry skillet over medium heat until they release their rich, nutty aroma.

Allow them to cool before proceeding to the next step.

Blend the Avocados and Pistachios: In a high-powered blender or food processor, combine the ripe avocados and toasted pistachios.

Blend until you achieve a smooth and creamy consistency.

Create the Ice Cream Base: Add the coconut milk, honey (or maple syrup), vanilla extract, and a pinch of salt to the avocado-pistachio blend.

Continue blending until all the ingredients are well incorporated, forming a luscious ice cream base.

Chill the Mixture: Transfer the mixture into a bowl and refrigerate for at least 2 hours. This step not only chills the ingredients but also allows the flavors to meld, ensuring a rich and satisfying taste.

Churn and Freeze: If you have an ice cream maker, follow the manufacturer’s instructions to churn the mixture.

If not, transfer the mixture to a freezer-safe container, stirring every 30 minutes for the first few hours to prevent ice crystals from forming.

Serve and Enjoy: Once the Pistachio Avocado Ice Cream reaches the desired consistency, scoop it into bowls or cones.

Garnish with a sprinkle of chopped pistachios for an extra burst of flavor and visual appeal.


This Pistachio Avocado Ice Cream is not just a dessert; it’s a symphony of textures and tastes. The creamy avocado contributes a velvety smoothness, while the pistachios infuse a delightful nuttiness.

With healthy fats and a touch of natural sweetness, it’s a guilt-free pleasure that won’t compromise your health goals.

Indulge in the decadence of this masterpiece, reveling in the fact that dessert can be both delicious and nourishing.


In Conclusion: Sweetness Without Sacrifice

In the world of healthy desserts, these 10 examples prove that you can have your cake and eat it too – literally!

Embrace the goodness of nutritious ingredients while satisfying your sweet cravings.

It’s a journey of indulgence without compromise, proving that dessert can be both delicious and diet-friendly.


Frequently Asked Questions (FAQs)


Can I include these desserts in my daily meal plan?

Absolutely! These desserts are designed to be enjoyed in moderation as part of a balanced diet.

 Are these recipes suitable for kids?

Yes, many of these recipes are kid-friendly, providing a healthier alternative to traditional sweets.

Can I customize these recipes based on my dietary preferences?

Certainly! Feel free to tweak the recipes to suit your taste and dietary needs.

Are these desserts diabetic-friendly?

Some recipes are naturally lower in sugar, making them suitable for those watching their sugar intake. However, it’s always wise to consult with a healthcare professional.

 How do I resist the temptation to overindulge in desserts?

Practice mindful eating and savor each bite. Portion control is key to enjoying desserts without derailing your diet.

RELATED ARTICLES

LEAVE A REPLY

Please enter your comment!
Please enter your name here


- Advertisment -

Most Popular

Recent Comments